
Introduction
Imagine the excitement of waiting for your iPhone’s update notice to bring new features. Instead, you see the “iPhone Software Update Failed” message. You’re not alone. Many iPhone and iPad users face this issue, which can be frustrating. The good news is that it’s often not as serious as it seems. Common causes include low storage, a weak internet connection, or problems with Apple’s servers.
This article will guide you through various solutions to fix the issue. Start with some basic fixes to resolve the problem. If the error persists, we’ll move on to intermediate troubleshooting. Finally, we’ll cover advanced repair methods for stubborn update failures. These steps will help you get back on track and keep your smartphone functioning properly.
Chapter 1: First Response – The Essential Checklist
Here’s a table summarizing the common causes and their simple fixes:
| Checkpoint | Why It Matters | The Simple Fix |
|---|---|---|
| Power & Battery | Running out of electricity may interrupt iPhone or iPad updates. | While updating, keep your device charged to 50% or plugged in. |
| Storage Space | Updates need free space to install properly. | Go to Settings > General > [Device] Storage. Delete or offload unused apps/media. |
| Internet Connection | Poor Wi-Fi can cause the update download to be corrupted. | Ensure you’re connected to a strong Wi-Fi network. Restart the router if needed. |
| Apple Server Status | Sometimes the problem is not on your side. | Check Apple’s System Status page. If “iOS Software Update” is down, wait. |
| Restart Your Device | Clears glitches that block the update. | Perform a restart or force restart before trying again. |
Chapter 2: Intermediate Troubleshooting – Taking Control
If the initial checks don’t work, the issue might be related to software or network settings. These methods are more advanced but still manageable.
2.1 Delete Update File and Retry
Update files may become corrupt due to a dropped Wi-Fi connection or slow download speeds. Deleting the file and starting over can yield better results. Follow these steps:
Step 1. Select “Settings > General > [Device] Storage.”
Step 2. Find the iOS update file below.
Step 3. Tap and select “Delete Update.”
Step 4. Download it again from Software Update.
2.2 Reset Network Settings
If uninstalling the update file doesn’t work, check your Wi-Fi. Cache settings or conflicts can prevent your device from reaching Apple servers. Follow the steps below:
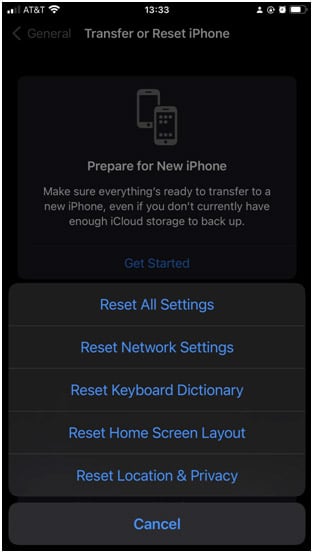
Step 1. Go to “Settings > General > Transfer or Reset iPhone.”
Step 2. Tap “Reset.”
Step 3. Choose “Reset Network Settings.”
After deleting all Wi-Fi passwords, you will need to reconnect to your networks. This remains one of the best Wi-Fi update fixes.
2.3 Update via Computer (iTunes/Finder)
Over-the-air (OTA) updates are convenient but can be unstable. A PC is usually more reliable for updating an iPhone that won’t. Let’s see how:
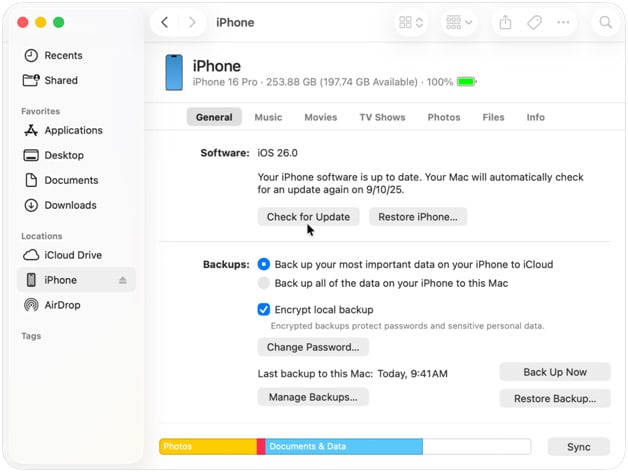
Step 1. Install the latest iTunes or Finder on Windows or Mac.
Step 2. Connect the iPhone or iPad via USB.
Step 3. Click your device when it appears.
Step 4. Select “Check for Update.”
Step 5. Click “Download” and “Update” for the latest updates.
Chapter 3: Advanced Solutions for Recurring Failures
3.1 Professional iOS System Repair Software
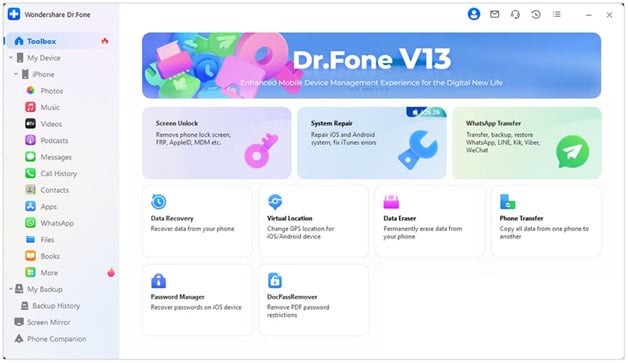
When simple fixes fail, consider professional tools. If the “Software Update Failed” message persists, a software issue may be present. Wondershare Dr.Fone – System Repair (iOS) can fix many system issues, including failed updates.
Dr.Fone is a professional iOS system repair software that fixes over 150 faults without data loss. It can quickly resolve issues with your device’s Apple logo, recovery mode, or update refusal.
Dr.Fone’s Standard Mode, with its no-data-loss function, is unique. This allows you to resolve issues like “iPhone Update Failed” without deleting images, applications, or other data. Dr.Fone supports iOS 26/iPadOS 26 and iPhone 17 Series.
Key features of Dr.Fone – System Repair (iOS):
- It fixes over 150 iOS issues, such as black screens, boot loops, recovery mode glitches, and software update failures.
- Standard Mode protects data during repairs.
- It supports all iOS versions, from iOS 13 to the previous versions.
- No technological expertise needed. Simple, supervised process.
- Click to enter or exit recovery or DFU modes.
How to Repair iOS System with Dr.Fone:
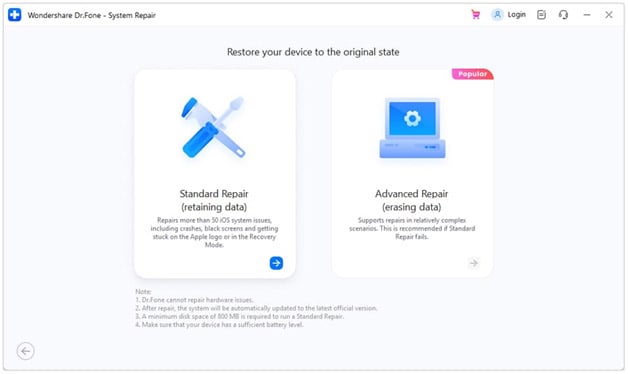
Step 1. To begin, download and install Dr.Fone – System Repair (iOS) on your computer. It supports Windows and macOS. Connect your gadget to the PC via USB. Open Dr.Fone and choose “System Repair.”
Step 2. Software automatically detects your device. Choose “iPhone” (or iPad) for your repair model. You can choose “Standard or Advanced Mode.”
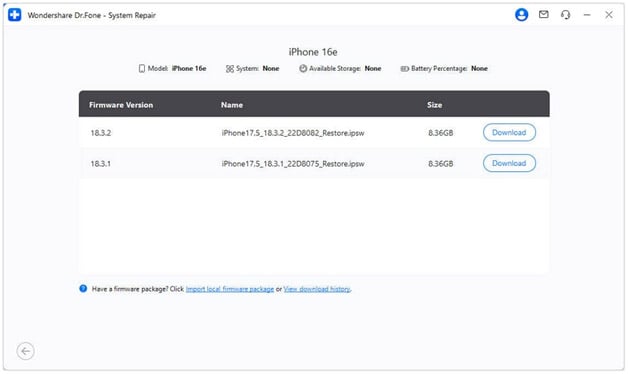
Step 3. Follow the on-screen prompts to boot into recovery mode. This is essential for repair. Skip this step if your smartphone is in Recovery Mode. It automatically detects the right firmware in Recovery Mode. Download the relevant files by clicking “Download.”
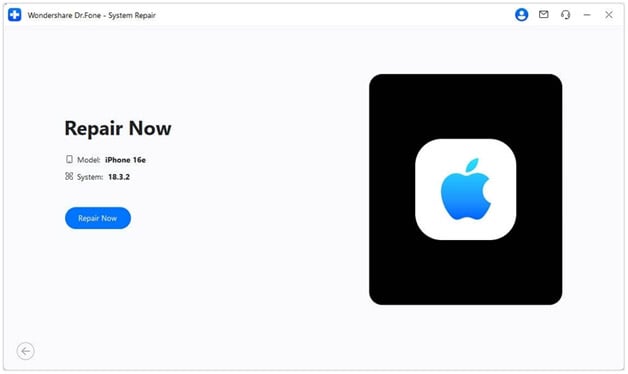
Step 4. Click “Repair Now” after downloading and verifying the firmware. Dr.Fone will fix iOS. Once repaired, your iPhone will reboot, and the issue should be rectified. Access your device and update it.
Chapter 4: Prevention is Better Than Cure – How to Avoid Update Failures
Avoiding update failures is always easier than repairing them. A little planning can help iOS updates go smoothly.
4.1 Best Practices Before Update
Back up your iPhone or iPad before updating. Backup data to iCloud or PC. Thus, you won’t lose important files, photos, or programs if something goes wrong.
Ensure sufficient device space before updating. Megabytes are needed for several iOS updates. Remove unnecessary apps and files from Settings > General > [Device] Storage.
Update your device using a trustworthy Wi-Fi network. Cellular data may slow downloads and damage updates.
Keep your device charged and connected during updates to avoid shutdowns. Plug it in and charge the battery 50% before updating.
4.2 Managing Beta Profiles
Installing an iOS beta profile may conflict with official upgrades. Beta profiles often conflict with stable releases, producing verification issues. To check and delete beta profiles:
Step 1. In the iPhone settings, go to ” General > VPN & Device Management.”
Step 2. Remove active beta profiles.
Step 3. Remove the beta profile to update normally.
Conclusion
While “Software Update Failed” on your iPhone or iPad is frustrating, it’s not always deadly. Initial checks include battery, storage, Wi-Fi, and Apple servers. If that fails, erase the update file, reset network settings, or refresh PC.
Dr.Fone – System Repair helps fix update difficulties without wiping your device. As a final option, Recovery Mode might restore your system but lose data. Backups, storage management, and strong Wi-Fi enable smooth device updates.


